Search This Blog

Friday, November 29, 2013

Easy As ABC Black Friday Finish

Happy Black Friday!  Thanksgiving Day is for overeating and Black Friday is for overspending.  Right?  My thanks to those bloggers who did take the time to post where all the good deals are at. 

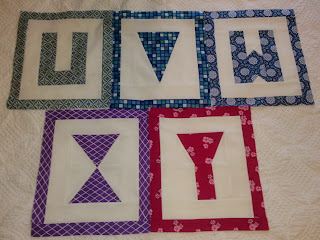
I am caught up with my Easy as ABC QAL.  Yay!  Here are pictures.


Going to link up to Blossom Heart Quilts and Crazy Mom Quilts.  This will be a Christmas gift to my Grandson.  He is almost 3, loves the alphabet and is reading some words!  Having fun with this although the X and Y were a bit tricky for me. 
 
So, that is how I spent my Black Friday other than surfing some great fabric sales and now I am off to go help my husband trim the tree.


Tuesday, November 26, 2013

Hop Skip and Jump Blocks Link Up


Here are my six seven blocks for the Hop Skip Jump BOM.  I have seven because I did the bonus block.  We are at the halfway point.  (Really!!??  It has been six months??) 

Because there are prizes, and I am a sucker for prizes, linking up to the Hop Skip and Jump Link Up.  : )  This BOM is hosted by Sew Lux Fabric.  Here is the link to the shop and their Thanksgiving Specials!

These are actually on my 4th Q FAL and are caught up! 

Sew far, sew good,
Julie

Sunday, November 17, 2013

A Big 4th Quarter Finish!

Drum roll, please!  Finally!  A 4th Quarter Finish!  Whooooo hooooo!

I can now cross Constellations quilt off of my project list.  I could go on and on about all the things that went wrong during this project.  There was some blood shed with a sewn finger (um, don't ask) and scissors falling off the ironing board with the pointy end stuck in my foot.  Unbelievably, I didn't get any blood on the quilt.  Whew!  It's done!  Finished!  Yay!

Here is a picture of Constellations quilted with binding sewn on the front:

 
The pattern is one called Midnight Sky by Michael Miller.  I made the pattern bigger in EQ7 and it ended up at  approximately 78" x 89". 
 
Here is a picture of the back:


The quilting pattern really shows up on the back of the quilt.  I used King Tut in the top and bobbin.

Friday, November 15, 2013

It's a Sham!

I have a Friday finish!  It has been a loooooong week.  I finished the quilt top and, upon request, made a quilted sham to go with the quilt.  But nothing has gone according to plan or smoothly. Probably because I was cajoled into finishing the quilt (and to make a sham) by Thanksgiving instead of before Christmas.  (Silly me,  I do know how to say, "No" - certainly wasn't in my right mind).  The quilt top, pieced backing are upstairs draped on the longarm.  The binding is sewn together, pressed and ready to go.  I will be busy all day tomorrow quilting and sewing on binding.   I do hope tomorrow goes a lot more smoothly than today!!


Sunday, November 10, 2013

Constellations Quilt top done!

Today, I finished sewing the blocks, rows together and the borders.  Whew!   Weekend of sewing but yay!  The quilt top is done!  Now for the backing, the quilting and the binding.  This will definitely be a finish for 4th quarter.  There are 30 blocks and each block has 45 pieces.  Lots and lots of flying geese! 


I love this one!  But alas, I can't keep it.  I made it for my neighbor and friend.  It is going to be a Christmas present for her 10 year old Grandson in Ohio. 
 
Need to catch up on some BOM's that I am in - just what I need after this quilt!

Wednesday, November 6, 2013

Buckeye Beauty Baby Quilt

I recently found out that a cousin of my husband is going to have a baby boy soon.  As they are big fans of OSU Buckeyes, I wanted to make a quilt with the Buckeye Beauty block - a traditional block.  As luck would have it, this Missouri Star Quilt Company Jacob's Ladder tutorial was e-mailed to me a couple of days ago.  I brought out a layer cake of Deb Strain's Meadow Friends from my stash.  Jenny uses charm packs in the tutorial, but I wanted to see what I could do with a layer cake.  I pulled out 16 squares that I liked and went to work.

Here is a picture of the top:

(Buckeye Beauty is also called Jacob's Ladder)
 
For the half square triangles, I marked a line diagonally from each corner.  I sewed a scant 1/4" from each side of the line drawn.  I then cut down each of the lines and down the middle.  Here is a picture:


I used my 4 1/2" HST Bloc-Loc to square them up.  (This is a gadget that I am using and enjoying!)


Here is how I made the 4 patch from the layer cake squares:


I marked a line down the middle of the square and then stitched a scant 1/4" on each side of the line.  I stitched down each edge of the squares going in the same direction.  I cut on the line in the middle, rotated the block 90 degrees and cut down the middle (5" in).  I rotated the block back and cut 2 1/2" from the middle cut parallel to the stitching 1/4" in from the middle and on the edges.  I pressed those open, laid them right sides together with the same colors opposite and seams nested, and sewed down the two edges again.  I then cut 2 1/2" in from the edge.


To use up the other layer cake pieces, I decided to go with a keyboard border.   I used leftover pieces in the backing. 
 
 
There you have it, how to make a Buckeye Beauty baby quilt with a layer cake!  A great time saver!  The ending size is about 42" x 42".  I did have about 5 pieces of the layer cake left.  So glad that I bought fabric for backing and binding back when I got the layer cake!